CHARITY LOG CABIN SQUARE to knit

MATERIALS
3 colors of worsted weight yarn
Size 10 knitting needles
Gauge: 14 sts and 28 rows in garter st (knit every row) = 4"
Note: Any weight of yarn can be used and any size needles, just try to keep the row and stitch gauge as square as possible. Start with a different color for each Square that you make. When sewing them together, make sure that no two Squares end with the same color. Lay them out on the floor and arrange them before sewing them together.
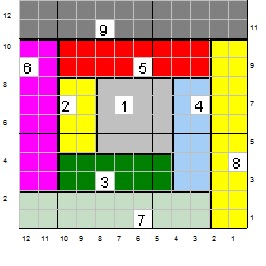
Section #1
With the first color, cast on 14 stitches.
Knit 27 rows (This will give you 14 ridges on the right side of work. Your first row will be a wrong side row.).
Bind off all sts, cut yarn. (Your bind off is ALWAYS done on a right side row).
Section #2
With second color; turn the piece 90 degrees clockwise and picking up one stitch for each ridge along side of Section #1 (this will give you 14 sts).
Knit 11 rows (this will give you 6 ridges on the right side of work). Your first and last row are both wrong side rows, this means that you next row, which is your bind off, is done on a right side row.
Bind off all sts loosely, leaving the last stitch on needle. Do NOT cut yarn.
Section #3
TURN your work 90 degrees clockwise and pick up 6 sts in the garter ridges along the side of Section #2 that you just completed; then pick up 14 sts along the cast on edge of the Section #1 to the corner (this will give you 21 sts).
Knit 11 rows (this will give you 6 ridges on the right side of work).
Bind off all sts loosely, leaving the last stitch on needle. Do NOT cut yarn.
Section #4
TURN your work 90 degrees clockwise and pick up 6 sts in the garter ridges along the side of Section #3 that you just completed; then pick up 14 sts in the garter ridges along the side of the Section #1 to the corner (this will give you 21 sts).
Knit 11 rows (this will give you 6 ridges on the right side of work).
Bind off all sts loosely, leaving the last stitch on needle. Do NOT cut yarn.
Section #5
TURN your work 90 degrees clockwise and pick up 6 sts in the garter ridges along the side of Section #4 that you just completed; pick up 14 sts along the bound off edge of the Section #1, then pick up 7 sts along the side (one for each garter ridge) of Section #2 (this will give you 28 sts).
Knit 11 rows (this will give you 6 ridges on the right side of work).
Bind off all sts loosely, cut yarn.
Section #6
With third color; turn the piece 90 degrees clockwise and picking up 7 stitches along edge of Section #5 (this is one stitch at the bind off and one st for each ridge), now pick up 14 sts along the bound off edge of Section #2, then pick up 7 sts long the edge of Section #3 (this will give you 28 sts).
Knit 11 rows (this will give you 6 ridges on the right side of work).
Bind off all sts loosely, leaving the last stitch on needle. Do NOT cut yarn.
Section #7
TURN your work 90 degrees clockwise and pick up 6 sts in the garter ridges along the side of Block #6 that you just completed; then pick up 21 sts along the cast on edge of the Section #3 to the corner, then pick up 7 sts long the edge of Section #4 (this will give you 35 sts).
Knit 11 rows (this will give you 6 ridges on the right side of work).
Bind off all sts loosely, leaving the last stitch on needle. Do NOT cut yarn.
Section #8
TURN your work 90 degrees clockwise and pick up 6 sts in the garter ridges along the side of Section #7 that you just completed; then pick up 21 sts along the cast on edge of the Section #4 to the corner, then pick up 7 sts long the edge of Section #5 (this will give you 35 sts).
Knit 11 rows (this will give you 6 ridges on the right side of work).
Bind off all sts loosely, leaving the last stitch on needle. Do NOT cut yarn.
Section #9
TURN your work 90 degrees clockwise and pick up 6 sts in the garter ridges along the side of Section #8 that you just completed; pick up 28 sts along the bound off edge of Section #5, then pick up 7 sts along the edge of Section #6 (this will give you 42 sts).
Knit 11 rows (this will give you 6 ridges on the right side of work).
Bind off all sts; cut yarn, leaving a long end for sewing.

Here is a picture of a Baby blanket that I made using this square.
Tomorrow, a crocheted bib using the Log Cabin Square technique.


2 comments:
It took me a minute to see the pattern block-very cool way to arrange them!
I love log cabin blocks. I have also used a different log cabin block and just kept going with the add ons to make a large block as a baby blanket for Project Linus. I finished it off with an i-cord border. It was a lot of fun and no joining of individual blocks was involved. Thanks for the great instructions!
Post a Comment